Customize Consent Preferences

We use cookies to help you navigate efficiently and perform certain functions. You will find detailed information about all cookies under each consent category below.

The cookies that are categorized as "Necessary" are stored on your browser as they are essential for enabling the basic functionalities of the site. ... 

Always Active

Necessary cookies are required to enable the basic features of this site, such as providing secure log-in or adjusting your consent preferences. These cookies do not store any personally identifiable data.

No cookies to display.

Functional cookies help perform certain functionalities like sharing the content of the website on social media platforms, collecting feedback, and other third-party features.

No cookies to display.

Analytical cookies are used to understand how visitors interact with the website. These cookies help provide information on metrics such as the number of visitors, bounce rate, traffic source, etc.

No cookies to display.

Performance cookies are used to understand and analyze the key performance indexes of the website which helps in delivering a better user experience for the visitors.

No cookies to display.

Advertisement cookies are used to provide visitors with customized advertisements based on the pages you visited previously and to analyze the effectiveness of the ad campaigns.

No cookies to display.

Agregar Firebase a tu app de Flutter

Tiempo de lectura: 3 minutos

Primero se crea el proyecto en Firebase

Después de iniciar sesión, haz clic en «Ir a la consola» para acceder a la consola de Firebase.

En la consola de Firebase, crea un nuevo proyecto haciendo clic en el botón «Agregar proyecto». Sigue las instrucciones para configurar el proyecto.

Después de tener el proyecto creado, veremos las diferentes opciones de configuración

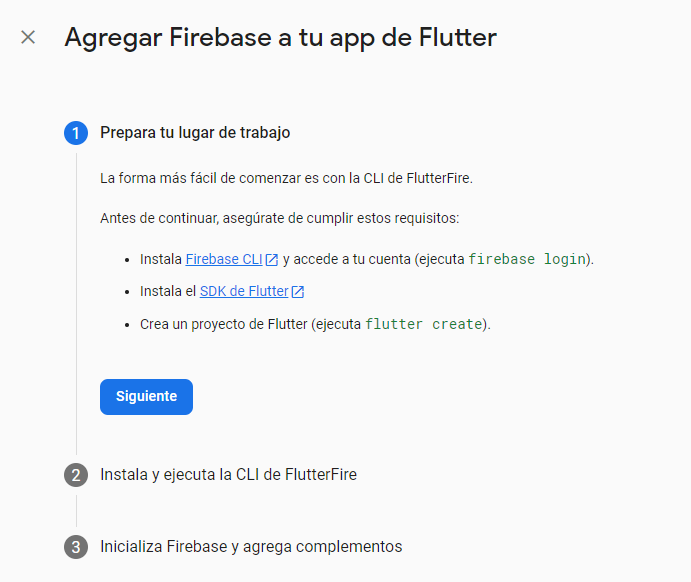
Para vincular el proyecto flutter con firebase pulsamos en la opción «Descripción general«, y seleccionamos Flutter como muestro en la siguiente imagen

Las opciones e instrucciones de Firebase nos irá guiando con una serie de pasos a seguir

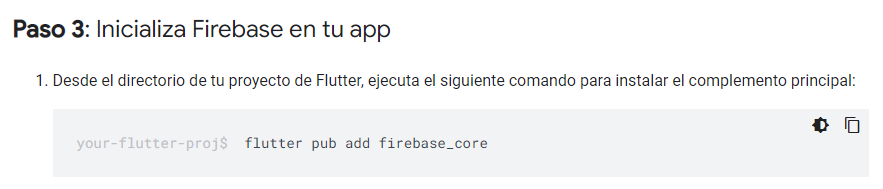
En nuestra consola dentro del proyecto Flutter ejecutamos el siguiente comando

Plain text
Copy to clipboard
Open code in new window
EnlighterJS 3 Syntax Highlighter
dart pub global activate flutterfire_cli

Después ejecutamos el siguiente comando para inicializar Firebase en la app

Si todos los pasos son ejecutados correctamente, en el proyecto creado en Flutter, aparecerá dentro de la carpeta lib un fichero con extensión .dart llamado «firebase_options.dart»

Por últimos para poder inicializar Firebase en el proyecto e ir añadiendo funcionalidades y complementos disponibles y que se facilitan a través del programa Firebase, debemos añadir el siguiente código que muestro a continuación dentro del fichero main.dart del proyecto creado en Flutter.

Plain text
Copy to clipboard
Open code in new window
EnlighterJS 3 Syntax Highlighter
import 'package:firebase_core/firebase_core.dart';
import 'firebase_options.dart';
void main() async {
await Firebase.initializeApp(
options: DefaultFirebaseOptions.currentPlatform,
);
runApp (const MyApp());
}
import 'package:firebase_core/firebase_core.dart'; import 'firebase_options.dart'; void main() async { await Firebase.initializeApp( options: DefaultFirebaseOptions.currentPlatform, ); runApp (const MyApp()); }
import 'package:firebase_core/firebase_core.dart';
import 'firebase_options.dart';


void main() async {
  await Firebase.initializeApp(
     options: DefaultFirebaseOptions.currentPlatform,
);
  runApp (const MyApp());
}

Espero que les sirva de ayuda y tengan un feliz día!!

1

Deja un comentario